


Trouble-Shooting
Troubleshooting Your Flashlight
1- LOOSE SWITCH
The #1 service call
we receive concerning Fenix flashlights is a loose silver o-ring in the tailcap. If your light works intermittently or if the LED goes on and off, more than likely it is a loose o-ring in the tailcap.
Follow these steps to troubleshoot:
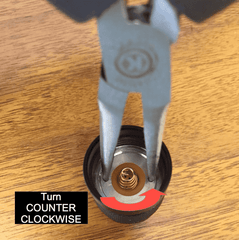
1. Remove the tailcap
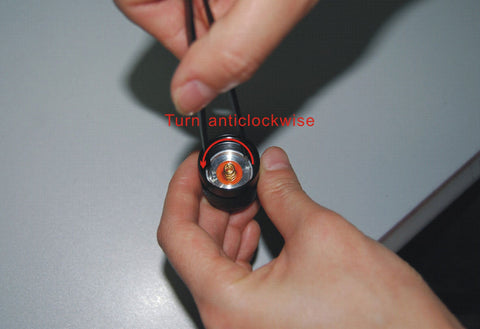
2. Look on the inside of the tailcap and you may see a silver o-ring with two little indentions in it.
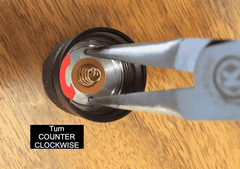
3. Take a spanner wrench or needle-nose pliers and place the tips in the little indentions in the silver o-ring in the tailcap.
4. Turn COUNTER CLOCKWISE. If the ring is loose any, that can cause your light to not work properly.
5. IMPORTANT: Do not put Loctite glue (or such) on the o-ring. To replace the switch in the tailcap, you have to be able to removed this ring to access the switch.
6. It's a good idea to periodically check to make sure it is secure. With the clicking on and off of your light, that ring can work loose.
NOTE: NOT ALL FENIX FLASHLIGHTS HAVE THE SILVER O-RING AS IN THE PHOTO. FOLLOW THE ABOVE STEPS IF YOUR LIGHT HAS THE TYPE OF O-RING IN THE PHOTO BELOW:
2- Light Won't Come On
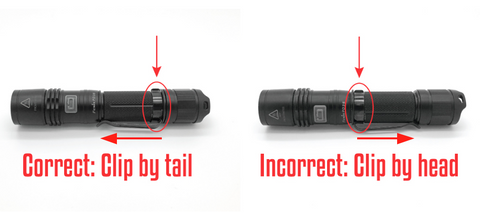
This applies to all the lights which have a removable head and tailcap. For example, PD35, UC35, PD32, etc. If you ever take your flashlight apart to clean it and you get the tailcap and the head reversed, your light won't come on. Some people also swap the ends so that the pocket clip is in the direction they want it. That causes the light not to work anymore. Below is the correct placement for the head and tailcap. Please pay attention to the direction the pocket clip is pointing.
Step-By-Step Trouble Shooting Guide:
If your LED flashlight has stopped working, don't panic! Chances are the problem is easy to fix. We'll give you a quick rundown of troubleshooting steps to take if your flashlight is in need of repair.
Double-Check Your Power Source
The first thing you should always do if your flashlight is not working is double check the batteries. Even if you're sure you put new, fresh batteries in your device, swap them out. You never know if it's a simple problem until you try a simple solution. If the problem persists, move on.
Clean Your Contacts
The next step is to clean your flashlight, including the terminals that make contact with the batteryies. Rubbing alcohol will clean any corrosion and will evaporate quickly. You should also clean any threading and add O-ring lube to your seals to ensure the light is assembled as intended. Below is a step-by-step video to clean an LED flashlight:
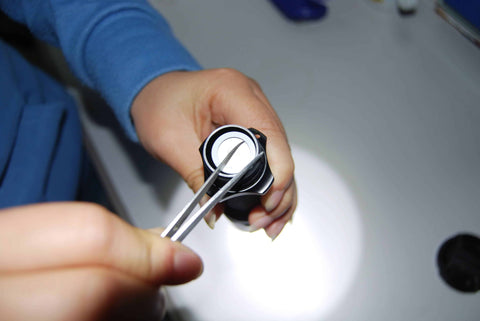
Diagnose Your Switch
If your light is clean and has fresh batteries, but still does not work, you should diagnose your switch. To do this, remove the tail cap (if the light uses a tail switch.) and ensure the batteries are installed correctly. Next, place a metallic object like some tweezers or a screwdriver across the tail section so that it makes contact with both the flashlight and the battery. If the light turns on, you know the issue is with the switch. If it does not turn on, the issue is with the LED or the circuitry surrounding it.
If all of this fails, you can resort to your flashlight's warranty. Most problems with LED flashlights have to do with the issues discussed above.
As a final tip, you can take apart the switch assembly. This is also useful if you have a new boot for your tail cap. Replacement boots are useful for changing the color of adding a glow-in-the-dark flair to your tail-cap. The video below shows the process in detail: